2024/07/24

ChatGPT「雞兔同籠」解題

李宏毅老師的「80分鐘快速了解大型語言模型」課程影片中,示範了ChatGPT可以用來解「雞兔同籠」,於是來試試問它公元四世紀、1600年前的題目:


結果真的回答出來了!

參考資料:

80分鐘快速了解大型語言模型(1:04:05處)
【校園冷知識13】經典的「雞兔同籠」,原來是這個朝代的數學題!(親子天下)

2022/07/12

LaTex: Bibliography styles - IEEE, APA

 This post shows how to configure the bibliography style.

\documentclass{article}

\begin{document}


\textbf{Style: plain}


Deep learning is very important \cite{DL_book_goodfellow2016}.


\bibliographystyle{plain} 

\bibliography{my_bib}

\end{document}


Plain - plain


IEEE - ieeetr

ACE - acm

APA - apalike


APA - apalike + natbib

\documentclass{article}

\usepackage[square]{natbib}

\begin{document}


\textbf{Style: apalike natbib}


Deep learning is very important \cite{DL_book_goodfellow2016}.


\bibliographystyle{apalike} 


\bibliography{my_bib}

\end{document}


\documentclass{article}

\usepackage{natbib}

\begin{document}


\textbf{Style: apalike natbib}


\cite{DL_book_goodfellow2016} is a textbook in deep learning.


Deep learning is very important \citep{DL_book_goodfellow2016}.


Citation format citeauthor \citeauthor{DL_book_goodfellow2016}.


Citation format cite \cite{DL_HA_review_wang2017}.


Citation format citet \citet{DL_HA_review_wang2017}.


Citation format citep \citep{DL_HA_review_wang2017}.


\bibliographystyle{apalike} 


\bibliography{my_bib}

\end{document}


Result:


Reference:

2022/06/12

Arduino: Hello World for WeMos D1 WIFI UNO

 Here are the steps for the WeMos D1 WIFI UNO:


1.  Select File -> Preferences


2.  Settings -> Additional Boards Manager URLs: 

http://arduino.esp8266.com/stable/package_esp8266com_index.json


3. Tools -> Board: "Arduino Uno" -> Boards Manager

4. Enter WeMos and select Install for ESP8266.


5. Select "LOLIN(WeMos) D1 R1


6. Select COM port


7. Write the simple code below and select the arrow to download

void setup() {
  // put your setup code here, to run once:
  Serial.begin(9600);
  Serial.println("Hello world, Arduino!");
}

void loop() {
  // put your main code here, to run repeatedly:
  
}


8. Select the Serial Monitor


9. You may see strange characters after you press the reset button.


10. Move the print line function into the loop. The strange characters only happen after pressing the reset button. So you may ignore them.

void setup() {
  // put your setup code here, to run once:
  Serial.begin(9600);

}

void loop() {
  // put your main code here, to run repeatedly:
  Serial.println("Hello world, Arduino!");  
  delay(1000);
}
 

Related information: 

2022/06/09

How to change the TeXShop spell check dictionary to American English?

TeXShop is a popular LaTex editor for macOS. If the spell check goes to the British English, you may see something like this:


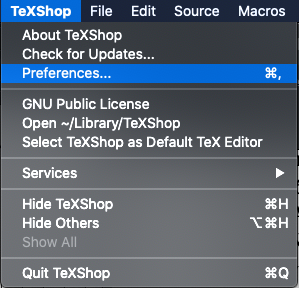
To change the dictionary, go to TeXShop -> Preferences.


Select Source -> Dictionary.


Select 'en' for American English. 


If it is already 'en', try select another option and quit TeXShop. Restart TeXShop again after you select 'en'. 

Final result:

Reference:

How to Change TeXShop dictionary to American English? (StackExchange) (The answers were a bit outdated.)

2022/05/02

Computational speed for PyTorch tensors using cuda().squeeze() and squeeze().cuda()

I am wondering which of the following codes in PyTorch work faster:

my_tensor.cuda().squeeze() vs. my_tensor.squeeze().cuda()


Check with the code:

time_start_vocoder = time.perf_counter()          

a = my_tensor.cuda().squeeze()


time_elapsed_test = (time.perf_counter() - time_start_vocoder)

print('a time=',time_elapsed_test)


time_start_vocoder = time.perf_counter()


b = my_tensor.squeeze().cuda()


print('b time=',time_elapsed_test)

Where

my_tensor.shape = torch.Size([1, a_large_number])

Result:

Run 1:

a time= 0.00013689976185560226

b time= 9.429734200239182e-05


Run 2:

a time= 0.0001775706186890602

b time= 0.00010665040463209152


Run 3:

a time= 0.0001584356650710106

b time= 6.485264748334885e-05


Swap the order of a and b in code:


Run 1:

b time= 0.0001363120973110199

a time= 0.00011534709483385086


Run 2:

b time= 0.00021496228873729706

a time= 7.021520286798477e-05


Run 3:

b time= 0.00020176637917757034

a time= 6.876792758703232e-05


Conclusion:


The execution time for my_tensor.cuda().squeeze() and my_tensor.squeeze().cuda() are similar, and my_tensor.cuda().squeeze() might be a little bit faster.

2022/04/20

Pi (π) in Torch Tensor - torch.pi

There is no pi (π) function in PyTorch with some version, so some people suggested to use math.pi or np.pi for conversion into torch tensor. For me, torch.pi works with a notebook without the GPU, but not with a computer with the GPU.

Here is the code to compare different implementations of the Pi function.

import torch

import numpy as np

import time

import math


#test pi

time_start = time.perf_counter()

pi_math = torch.tensor(math.pi)

time_elapsed_test = (time.perf_counter() - time_start)

print('math pi time =',time_elapsed_test)


time_start = time.perf_counter()

pi_np = torch.tensor(np.pi)

time_elapsed_test = (time.perf_counter() - time_start)

print('np pi time =',time_elapsed_test)


time_start = time.perf_counter()

pi_torch = torch.pi

time_elapsed_test = (time.perf_counter() - time_start)

print('torch pi time =',time_elapsed_test)


time_start = time.perf_counter()

PI = torch.acos(torch.Tensor([-1]))

time_elapsed_test = (time.perf_counter() - time_start)

print('PI time =',time_elapsed_test)


Results for computation time:

math pi time = 3.6502000057225814e-05

np pi time = 1.9006000002264045e-05

torch pi time = 8.009999419300584e-07

PI time = 0.00035780000007434865


Hence torch.pi is the fastest.


Without torch.pi, you may use torch.tensor(np.pi)

For an accurate pi, cast the type to float64:

torch.tensor(np.pi, dtype=torch.float64)

Example:

(Pdb) torch.tensor(np.pi)*100000

tensor(314159.2812)

(Pdb) torch.tensor(np.pi, dtype=torch.float64)*100000

tensor(314159.2654, dtype=torch.float64)

MATLAB:

pi = 3.141592653589793

Reference:

Np.pi equivalent in Pytorch

Is there the Pi greek (3.1415…) defined somewhere?

2022/03/15

Python: Short-Time Fourier Transform (STFT) and its inverse transform (ISTFT) using librosa

Below shows an example using STFT to transform speech into the frequency domain and ISTFT to transform the spectral data back to waveforms in the time domain. The Librosa package is used.

import librosa

import soundfile as sf

x, sr = librosa.load('1.wav', sr=None)


n_fft = 256

hop_length = 128

win_length = 256


X = librosa.stft(x, n_fft=n_fft, hop_length=hop_length, win_length=win_length)


y = librosa.istft(X, n_fft=n_fft, hop_length=hop_length, win_length=win_length)


sf.write('1_istft.wav', y, 16000)

Results for x and y:


References:

Matlab: Short-Time Fourier Transform (STFT) and its inverse transform (ISTFT) (StudyEECC)

librosa.stft

librosa.istft